Here's how we learn to tell the time. I bought this big yellow clock from Learning Resources, it has four changing faces [hour times, minutes, a blank clock and a face with 3,6,9 and 12 only] and a write on surface. There is a traditional Montessori clock, however I found it quite pricey.
PRESENTATION 1: To start off I introduce the children to the clock hands: hour hand and minute hand and do a three period lesson if needed. I check that they can read all the numbers on the clock. Then I explain that when the 'minute hand' points to 12 we say o'clock as it is the beginning of the hour. Usually i have the minute hand pointing to 12 and the hour hand pointing to 1. I then explain that the hour hand tells us which hour it is and ask the child to tell me what number its pointing to. I turn the clock hands to make 2 o'clock, 3 o'clock and so on asking the child to tell me the time. Then I might tell the child a time and ask him to make the clock say it. Usually the child would then go on to working with the Montessori clock activity [last few pictures ] and make a 0'clock book using a clock stamp. Easy stuff so far, but i noticed that some children find it hard to understand the next few concepts.
PRESENTATION 2: Before moving onto half past, the child must have worked with the fraction circles. They should understand what 1/2 , 1/4 and 3/4 means. I explain to the child, that when the minute hand is pointing to 6 we say half past, as half of the hour has past. I show the minute hand starting from 12 slowly moving round to 6. Some children understand this easily...but a few don't fully understand what is meant by half past and that's why I might do the following activity.
Step 1; I ask the child to go get me the circle inset, a pair of scissors, a piece of paper and a pencil. Step 2; We trace the circle inset and I split it into 12 parts and ask the child to write the numbers as on the clock.
Step 3; Again I show the child how the minute hand starts at 12 and moves around until it is at 6. Step 4; We draw a line from 12 to 6 and I ask the child to cut on that line. So we now have a clock cut in half.

Step 5; Next we get the 1/2 fraction circle [which should be the exact size of 1/2 the inset circle] and I ask the child to name it and place it on the clock, telling me if from 12 to 6 is half a circle or not. Of course it is! And my child is fully convinced that when the minute hand points to 6 it is half past the hour!
Montessori clock activity
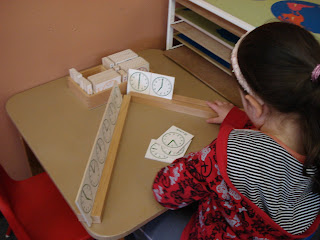
Below are a few pics of the Montessori clock activity. This is a very old activity, I tried to find this online but none of the Montessori suppliers i know of sell it.
This activity is great for practicing with the clock. It comes with 4 sets of cards, o'clock times, 1/2 past, 1/4 past and 1/4 to. Each set is colour coded. The clock cards each have a clock face telling a time and below it the time written.
Step 1: The child takes a set and places the clocks in the wooden slots so that they stand upright and the written time is hidden.
 Step 2; Next the child takes the time cards and lays them out on the table in front of them. The child looks at the first clock face, says the time and then finds the time card that matches it.
Step 3; When the child has finished they check they're answers by lifting the clock faces to show the times written beneath.
The 1/4 past and 1/4 to times are taught in the same way. I'll try to post about the minuet times when I get a few pictures of the activities.


1 comment:
Hi - I'm browsing your blog, this is an older post but just wanted to mention that this clock exercise is a Nienhuis product, available online. Not inexpensive, though. It would be possible to make the 3 part cards, and lay them flat under a strip to cover the label, for matching ... but the little wooden tablets ARE nice.
Post a Comment