Thursday 26 March 2009

February Pictures

Some of the many pictures I take at school and never have time to blog about. If you would like to know more about one of the pictures or materials then leave me a comment and I'll get back to you. 
Roman Arch.

Addition Chart B. This girl has finished her work and is checking her answers.

Hundred board.

Hama Bead display.

Hundred Chain.

Making something with the Hama Beads.

European flags puzzle.

Fraction circles.

Weaving.

Reading together.

Decanomial squares.

An older child doing my job for me. 

A life cycle of a bug the Little-N constructed from the pattern blocks. The bug starts off from the first green square he is pointing at.

The mother bug!

The daddy bug I believe!!

Little-N working with the pattern blocks.

Grammar work.

Classroom grown flowers.

Construction with the 'Tree Blocks'.

Decanomial Squares [can you see the resemblance to another material?]

Saturday 21 March 2009

Telling the time


Here's how we learn to tell the time. I bought this big yellow clock from Learning Resources, it has four changing faces [hour times, minutes, a blank clock and a face with 3,6,9 and 12 only] and a write on surface.  There is a traditional Montessori clock, however I found it quite pricey.

PRESENTATION 1: To start off I introduce the children to the clock hands: hour hand and minute hand and do a three period lesson if needed. I check that they can read all the numbers on the clock. Then I explain that when the 'minute hand' points to 12 we say o'clock as it is the beginning of the hour.  Usually i have the minute hand pointing to 12 and the hour hand pointing to 1. I then explain that the hour hand tells us which hour it is and ask the child to tell me what number its pointing to. I turn the clock hands to make 2 o'clock, 3 o'clock and so on asking the child to tell me the time. Then I might tell the child a time and ask him to make the clock say it. Usually the child would then go on to working with the Montessori clock activity [last few pictures ] and make a 0'clock book using a clock stamp. Easy stuff so far, but i noticed that some children find it hard to understand the next few concepts. 

PRESENTATION 2: Before moving onto half past, the child must have worked with the fraction circles. They should understand what 1/2 , 1/4 and 3/4 means.  I explain to the child, that when the minute hand is pointing to 6 we say half past, as half of the hour has past. I show the minute hand starting from 12 slowly moving round to 6.  Some children understand this easily...but a few don't fully understand what is meant by half past and that's why I might do the following activity. 

Step 1; I ask the child to go get me the circle inset, a pair of scissors, a piece of paper and a pencil. Step 2; We trace the circle inset and I split it into 12 parts and ask the child to write the numbers as on the clock.
Step 3; Again I show the child how the minute hand starts at 12 and moves around until it is at 6. Step 4; We draw a line from 12 to 6 and I ask the child to cut on that line. So we now have a clock cut in half. 
Step 5; Next we get the  1/2 fraction circle [which should be the exact size of 1/2 the inset circle] and I ask the child to name it and place it on the clock, telling me if from 12 to 6 is half a circle or not. Of course it is! And my child is fully convinced that when the minute hand points to 6 it is half past the hour! 

Step 6: We then go back to the yellow clock and I ask the child to make a few 1/2 past times.

Montessori clock activity 
Below are a few pics of the Montessori clock activity. This is a very old activity, I tried to find this online but none of the Montessori suppliers i know of sell it.

This activity is great for practicing with the clock. It comes with 4 sets of cards, o'clock times, 1/2 past, 1/4 past and 1/4 to. Each set is colour coded. The clock cards each have a clock face telling a time and below it the time written.

Step 1: The child takes a set and places the clocks in the wooden slots so that they stand upright and the written time is hidden. 
Step 2; Next the child takes the time cards and lays them out on the table in front of them. The child looks at the first clock face, says the time and then finds the time card that matches it. 

Step 3; When the child has finished they check they're answers by lifting the clock faces to show the times written beneath. 

The 1/4 past and 1/4 to times are taught in the same way. I'll try to post about the minuet times when I get a few pictures of the activities.

Thursday 12 March 2009

The BANK GAME....


I've been meaning to do this post ever since I read this post at 'Our Montessori Story'. This is my attempt at explaining how to use the Bank game but its difficult to write it all down, a live presentation is the best! 
The Bank Game [which is different from the golden beads bank game] is use for long multiplication. Before using this the children should have already had plenty of practice with the stamp game, dot exercise, small bead frame, large bead frame, checker board and flat bead frame. They should have also worked with all the multiplication boards and charts and already memorise some multiplication facts. So basically they should already have a good understanding of long and short multiplication.

This exercise should be done with a group of 3-4 children. There are four different roles that the children can play, the controller: who chooses the problem and makes sure the work is being done properly, the banker: who looks after the cards and hands them out, the cashier: who does the calculations, the book keeper: who does the recording.

The cards are laid out like this :

The white cards are used for getting the answers, the solid coloured cards are used to make the multiplicand and the grey cards are used to make the number that you are multiplying by.

For this presentation our problem will be 4621x13

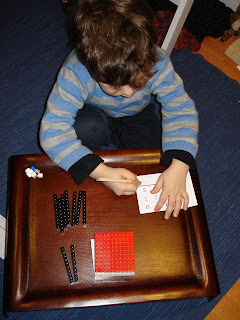
The Cashier needs to ask the banker for 4621 which is broken down into 4000, 600, 20, 1 as below and placed in a stair. The cashier then asks the banker for 13 to multiply it with, this is 10 and 3 from the grey cards. These are placed on the right side of 4621.

The cashier then starts the multiplication. He moves the grey 3 across to 4621 and starts by multiplying the stair from the top and asking the banker for the answer from the white cards. The white cards are placed in a horizontal line below the stair as in picture. So for this sum the child would do 1x3, 20x3, 600x3 and 4000x3.

The 3 card is then turned over and the cashier starts multiplying 4621 by 10 and placing the white answer cards in a horizontal line below the previous line. With the white answer cards all 10,000s 1000s, 100s and 10s are placed in columns under each other.
So the child will multiply 1x10, 20x10, 600x10 and 4000x10. Once the child has finished that he places the 10 upside down under the upside down 3.

The white answer cards are then changed to simplify the cards, so 60 and 10 are changed for 70,..... 800 and 200 are changed for 1,000 and placed in the 1,000 column. Next 1,000, 2,000 1,000 and 6,000 are changed for 10,000 and that is placed in the 10,000 column. Finally the two 10,000 and 40,000 are changed for 60,000. 
This then leaves us with 3 cards 60,000, 70 and 3. Which gives us the answer 60,073 as below.
I hope this helps anyone who is trying to figure out how to work with this, if you need any help leave a comment and I'd be happy to help if i can.


Homeschooling group

Recently Little-N has been asking me daily if he can be home schooled. Although i absolutely love homeschooling and would prefer to do that, sadly it is not an option at the moment. However luckily i recently met a mother who has been homeschooling her 4 year old son and we agreed to meet weekly to homeschool the children together. Although we would enjoy the company of many other children, we decided to keep it small for the moment, small as in 2 children. The mother is french and will be teaching Little-N french [which he should really learn as most of his fathers family speak french] and I will be working on mathematics with her son as well as montessori based activities. Here's what we did today:

The children made a few patterns with 'A bag of shapes' activity that i recently bought. These shapes are different from the pattern blocks and include other polygons. This particular pattern was Little-Ns.
The children worked with some sewing boards.

I decided it would be wise to check my friends son's [who I will refer to as S] understanding of numbers and quantity. We worked with the cards and counters which he really enjoyed. These are not actually counters but magnetic chips [that's all i could find to use] don't you think they look great?
We then went on to working with the short bead stair. I did the first presentation in which you show the child how to count and build the short bead stair. S was really excited and so was I since it has been a long time since I presented this activity. I suddenly felt I'd missed the 3-6 class. It was really interesting to work with a non-montessori child and see how they do things differently.

The children also took Animals and colours in french. Little-N came home and was pleased with his new language and he has been using bits of it here and there.

I'm excited I think we're gona have a great time learning together.

Lego Golden beads


Here is an alternative to the Montessori golden bead material that can be used at home. I was inspired to make this for Little-N to practice his golden beads equations, for the past three months he has been totally obsessed with lego and spends a lot of time playing with it. He gives all the piece numerical names, so I took it one step further and we made 10 bars, 100 squares and a 1000 cube [only have enough lego for one 1000 cube].
Here are the ten bars we made.

Here are the 100 squares and one 1000 cube


And here is little-N using the lego golden bead material to do some addition sums. These aren't ideal, but make a good alternative for those who are on a tight budget or to spice up the activity a bit.

Sunday 8 March 2009

Its a.......checker board

Anyone know what this black roll might be???
Its the key to long multiplication.
I finally finished making a felt checker board and I am delighted with it. It took so long to make as i made so many mistakes and had to restart several times. Part of this has been stitched by hand during the school meetings and the rest on my mothers sewing machine.


Wednesday 4 March 2009

Cleaning Chores

Recently I have been reading 'Montessori Today' by Paula Polk Lillard and found some very interesting ideas that i wanted to include in my class. In chapter 7 ' Freedom and Responsibilities',  Lillard talks about the elementary children taking on nearly complete responsibility for the classroom. She goes on to discuss three steps to help the children to develop a total responsibility of the environment.

Since I do not have an assistant or co teacher, I sometimes find myself lost in the daily cleaning, checking and making new materials. The children do help, but I haven't relied on them to really take responsibility, but this week I changed that. I called a class meeting and explained that it would be great fun if we could all share the responsibilities, I explained that everyone will have chores that they must make sure the do them before lunch and before home time. I asked the children which areas of the class would need daily care and cleaning, we listed the following areas. 
-Language area
-Mathematics area
-Cultural area
-advanced practical life area
-Sensorial area
-Bins
-Cleaning tables and chairs
-Mats
-Floor
-Library and books

The children volunteered for the areas they would like to be responsible for this month. I'm so grateful that all my children are so co-operative. I made a chores chart and placed it on the notice board. Everyone was so excited.

Close to lunch time, all the children independently began doing their chores. When all the chores were done, we gathered all the children and went around the class for inspection, checking if shelves were dusty, if there was mess behind the bin and if all the materials were straight and complete. The inspection, helps the children see where they have forgotten or missed things, I try not to be the one that points something out, but let them find the mistake themselves.

With each area, I sat with the child explaining what needs to be done and how to count and check that materials are complete.

So far, my class has been completely spotless thanks to the children!

Polydron an extension to the geometric solids


Recently I introduced a polydron activity as an extension to the geometric solids. Polydron is a manipulative construction material that can be used to explore 2 and 3 dimensional geometry and mathematical concept. 

I played with polydron as a child and spent hours constructing complex geometric shapes and till now I still enjoy playing with it. Little-N has been constructing with it since he was just a year old.

I decided to leave this activity until after the children have learnt all the geometric solids so that they will be familiar with mathematical language that is valuable when working with this.
For the first presentation I simply showed the children how the pieces can click together, I then showed them how to construct a cube. Once the children were able to make cubes, I ask a child to get the geometric solids and waited to see what other shapes they could make. They were able to make most of the straight sided shapes with ease. 

While constructing a cube, one child said 'You need six squares for a cube' and another child said 'You need a square and four triangles to make a square based pyramid'.  This is precisely the understanding I wanted to see and develop through this material.

You can buy polydron sets from this website.