Showing posts with label 3-6 Montessori. Show all posts

Sunday, 18 October 2015

Free Downloads Updated

I have updated my download page and fixed any broken links.

Please find the latest verion of my downloads here. I will continue adding to this list as I post new material. Please let me know if a link is not working or if there is an error on a file. Feel free to download and use these files but link back to my blog when you share them. Do not copy or sell these files.

Language


Mathematics

Geometry


Science

Organ Cards - post

Friday, 14 October 2011

Flower Arranging

Everyday we have a vase full of fresh flowers on display in the Practical Life area.

Below the vase we have a flower arranging activity which is basically a tray that contains various small vases and a pair of scissors.
Children are shown how to take a vase, fill it half way with water and use the scissors to cut the flowers they would like in their vase.

Here is an example of a four year old's flowers. Very nice!

The child can then take their vase to the table that their working at and put in the top left corner of their table. Having flowers at a child's table makes such a difference to their concentration and well-being.

Sunday, 9 October 2011

Washing Tables

This week I set up two washing tables for the children. One table is for washing hands and the other is for washing the dirty cloths from polishing and cleaning activities. Here are what the tables look like:

Hand washing table:
Cloth washing table:
The older children in the classroom have really enjoyed working with these activities. They have developed a sense of responsibility for the cleanliness of the classroom and have spent a lot of time on the cleaning activities in the class.

Saturday, 1 October 2011

The Start of a New Montessori School

Finally I have found the time to blog! I've worked my entire summer, day and night setting up and preparing a Montessori school. With the help of many volunteers and parents we managed to have the school ready for it's opening on the 12th of September.

I wanted the start of the school to be smooth and tranquil allowing the children, parents and staff to have a peaceful time to settle in. To achieve this we decided to stagger our intake over a period of three weeks, starting with the oldest children. This allowed each group of children to bond with the staff and settle in the environment before the next group started. The youngest children started at the beginning of this week, this was the group I was most anxious about as some of the children have just turned 3. Amazingly our week ended with a classroom of happy and peaceful children.

A lot of time, effort, research and skill was put into the design and layout of the classroom to provide the best environment for the children. I haven't got photos of the whole classroom to share however I do have a photo of one of my favorite features: the child sized sink. With the help of two handy parents, we managed to find away to install a kitchen sink at the perfect height for children. I set the sink area up with all the necessary tools needed for children to independently wash their own dishes, this has become one of our most loved activities.

Now that things have settled and calmed I hope to post regularly about our environment and experiences. I'll also be posting about Little-Ns work and homeschooling.

Friday, 17 June 2011

Montessori Pink Series & giveaway


Here is a quick overview of the Pink Level [stage one] literacy materials often used in Montessori classrooms. All the words in the pink series consist of two or three letters phonic words typically in the letter format CVC [consonant, vowel, consonant]. All letters in each word must be completely phonetic and represent the sounds learnt with the sandpaper letters. Some words such as car, are three lettered CVC words but are not phonetic so be careful to make sure words are completely phonetic. Before starting with the pink series children must have completed the previous activities I post about before here.

Pink Box 1:
Materials:
A box of six phonetic objects at pink level
Moveable alphabet and mat

The child chooses an object, identifies the sounds in the in the word, gets the correct letters from moveable alphabet and builds the words on the mat. At this stage we do not get the child to read back the words they have built.

Pink Box 2:

This is used exactly the same way as pink box 1 but the child has a box of six pictures instead of objects.


When the child has worked with pink box 2, you can begin working with rhymes. Make a letter combination with the moveable alphabet e.g 'at', the child can place letters in front of 'at' to see what words can be made that rhyme with 'at'.

Pink Box 3:
Materials: A box containing six objects and matching word cards.

This will be the child's first presentation in reading. The child should arrange all the objects on a table mat in a horizontal line. The child will then take one word, sound it out and blend the letters to read the word. The child then places the word underneath the correct object.

Alternatively, the teacher or parent can write the words on a slip of pink paper instead of providing a printed card.

Pink box 4:


This is used the same as pink box 3, however pictures are used instead of objects. The child is gradually working towards more abstract reading, with only pictures and words.

As the child progresses I will begin to make the boxes more complex by placing pictures that begin with the same letter.

Pink Card:


This is used for further practice with blending and is very similar to pink box 4. The words are kept in an envelope on the back of the card.

Pink box 5:

This box contains six words printed on paper and folded into quarters. The child should take a paper, unfold it, read the word quietly to themselves and then place in on the lid of the box. To make this activity exciting, I use pink level verbs e.g. 'hop'. The children work with the box as a group, one child will take a word, read it silently and then do the action. The other children have to guess what word the child had.

Pink lists:


Here the child will begin reading more words with less visual clues.

Sight words:
Once the child has worked with the lists, begin presenting the Sight words. These should be presented using the '3 period lesson'. It is extremely important at this stage to be consistent with presenting the sight words, I will usually do this daily, presenting individually to each child that is ready. By learning the sight words at this stage, the child will be able to move onto reading phonetic books with ease. You can print a list of sight words here.

Pink Phrases:
Here the child will begin to read simple strings of words. This activity is done in preparation for reading sentences.
Capital letters:

In order to progress further in reading, the child will now need to recognise the capital letters. I have a post about presenting these and free download for the file here.

Pink Sentences:
Here the child will begin to read sentences. This activity is done in preparation for reading books. Explain to the child that a sentence begins with a capital letter and ends with a full stop. The child should name the sight words and sound out the phonetic words.

Pink Level Books:
After working with the sentences children can begin reading pink level books. These are books that only contain sight words and pink level words. I have an old post here about the books I used with Little-N, it is really hard to find good books at this level, I have not yet found a series of books that I am completely happy with. If you know of any please let me know. In the meantime, my mother will be writing a series of books to be used with the pink series. I will post about the books once she's completed them.


Now for the giveaway...

I sell a download for the complete pink series materials in my shop. Since I am posting about the pink series here, I would like to giveaway a set for free to one of my readers.

The set includes:

- 36 word cards to match to your own objects
- 48 pictures with 48 word cards to match
- Printable moveable alphabet
- 24 secret words
- 4 word cards [each contains six pictures and six words]
- 16 word lists
- 16 phrase strips
- 12 sentence strips

You can read more about the set here.


To enter the giveaway, simply make sure you are following my blog and leave a comment on this post. Make sure you leave a contact email if it does not show up on your profile or blog.

If you would like more than one entry to the giveaway then..
-Sign up to my shops newsletter and leave a second comment [Sign up at the bottom of shops home page]
-Post about this giveaway on your blog and leave a link in the comment

Please note that the winner will receive a email with the downloads for all the PDF files. You are welcome to enter wherever you are on the globe.

This giveaway will end on Friday the 24th of June 2011. The winner will be selected by a random generator and I will update this post for the winner on Saturday and email the winner. If for some reason I can not contact you or, you do not get back to me within one week of the giveaway closing I will choose a new winner.

Good Luck!

Tuesday, 24 May 2011

Montessori Language Scheme

As a Montessori Elementary teacher who previously worked in an 3-6 classroom, I have had many opportunities to take children on a reading journey starting from playing the 'I spy game', progressing gently until they become better readers than I.

As many of you already know, in the Montessori method children learn to read phonetically. As far as I know we have two different English reading schemes that various Montessori teachers and organisations use. These are as follows:

The Muriel Dwyer method:

Here the children will begin the language scheme by various language games and the 'I spy game'. Dwyer identifies 40 sounds in the English language, 26 with single letter symbols and 14 with double letter symbols. Children are introduced to the sandpaper letters for the 40 sounds. 26 letters will be the usual a-z sandpaper letters and 14 will be of double letters and are usually on a green background. Once the children know all the letters they then work with the moveable alphabet making words which contain the 40 sounds. Children are provided with two baskets containing objects, the teacher will write words for each object for the child to read. The child will then progress onto 13 phonogram folders that contain different spellings for key sounds. This is a very short explanation of the Dwyer language scheme, you can read more about it on What We Do All Day, she has some great posts about this scheme. There is also a book written by Muriel Dwyer called 'A Path for the Exploration of Any Language Leading to Writing and Reading' and can be purchased here.

The Pink, Blue and Green series:

In this scheme the children will also begin with various language games and the I spy game. After completing these games, the children will begin working with the sandpaper letters learning the symbols for letter sounds a-z [letters can be learnt in any order]. Once the child has mastered all the sandpaper letters they will be introduced to the Pink Series. The pink series contains 3 letter phonetic CVC [consonant vowel consonant] words. The child will begin with making CVC words with the moveable alphabet and gradually progress through the materials to reading short stories that contain CVC words. Next is the blue series, here the child will be working with 4 letter phonetic words and progress onto much longer phonetic words. The child will begin with making the words and progress onto reading stories containing blue level words. Finally the child will work with the green series which contains phonograms and letter diagraphs.

There are also other schemes that I have seen being used in Montessori schools that are neither Dwyer nor Pink Blue and Green, but seem to be a combination of the two.

When I trained many years ago I learnt to use the Pink, Blue and Green series. I began working with the Pink Blue and Green series, but as time progressed and the children got older I noticed some short comings in the scheme. As the children progressed further and new children began working with the scheme, I was able to study the series further and managed to refine the scheme so that it works better and suited the needs of all children.

I have seen and witnessed the Dwyer scheme being used, I like some activities from it however from experience I have found the 40 sandpaper letters to be too much and at times confusing for the child. I have taken some activities from the Dwyer scheme and use them with the Pink Blue and Green series.

My next post will be about the Pink Series and with example of how it can be used at home.

Monday, 16 May 2011

Matching Sandpaper Letters to Moveable Alphabet


I got side tracked from my language posts that I wrote about here, here and here. I'm hoping to continue them in order to provide a resource for parents who are home-educating. It's best to start reading from the first post as I have sequenced the materials in order. If you have any questions leave me a comment.

Once your child has learnt about 85% of the letters in the alphabet, they're ready to move on. You continue the three period lesson with sandpaper letters, but you also start using the moveable alphabet.

Moveable alphabet presentation 1:

The first presentation of the moveable alphabet is simply a matching exercise. Introduce the child to the moveable alphabet by naming it. Show the child how to place it on a mat and open the box. Next ask the child to get the sandpaper letters and place the box on the mat. Explain to the child that the letters in the moveable alphabet box are the same as the letters they learnt with the sandpaper letters. Ask the child if they can name any familiar letters they see in the box.

Explain to the child that we are going to match the moveable alphabet to the sandpaper letters. Take a sandpaper letter, name it and place it on the mat. Show the child how to run a finger along the moveable alphabet box to search for the letter. It is important to show the child how to correctly search for a letter. If a child doesn't know how to search the box, they may take a very long time to find each letter and get put off the moveable alphabet.

Once the child has found the letter, they place it on the sandpaper letter, matching to see if the letters are the same. They continue in the same way taking a letter from the sandpaper letters and finding the matching letter in the moveable alphabet.


When the child has completed matching the letters, show them how to place the letters back in the box correctly. The child can then put the sandpaper letters back in the box and tidy up the activity.

Moveable alphabet presentation 2:

In this presentation the child is shown how to make words by placing letters next to each other.

The child can choose any word, even if it is not phonetic. The child can then use the moveable alphabet to make the words starting from the beginning letter. If the child completed the I spy games they should be able to break the word down in to individual sounds. It does not matter if the child spells the words incorrectly, this activity is only for seeing how the moveable alphabet is used to make words.

In this example the child wrote, fluwr-flower, letrs-letters and Ali. Once the child has understood the concept of using the moveable alphabet letters to make words, they're then ready to start on a language series.

My next post will be about the language series that I use.

Friday, 25 March 2011

New school opening


A new Montessori school is opening up near my house and I have joined them as a Montessori consultant. The school aims to be an authentic Montessori school and I am really honoured to be part of the team. They will start with ages 3-6years and gradually build up to a primary school.
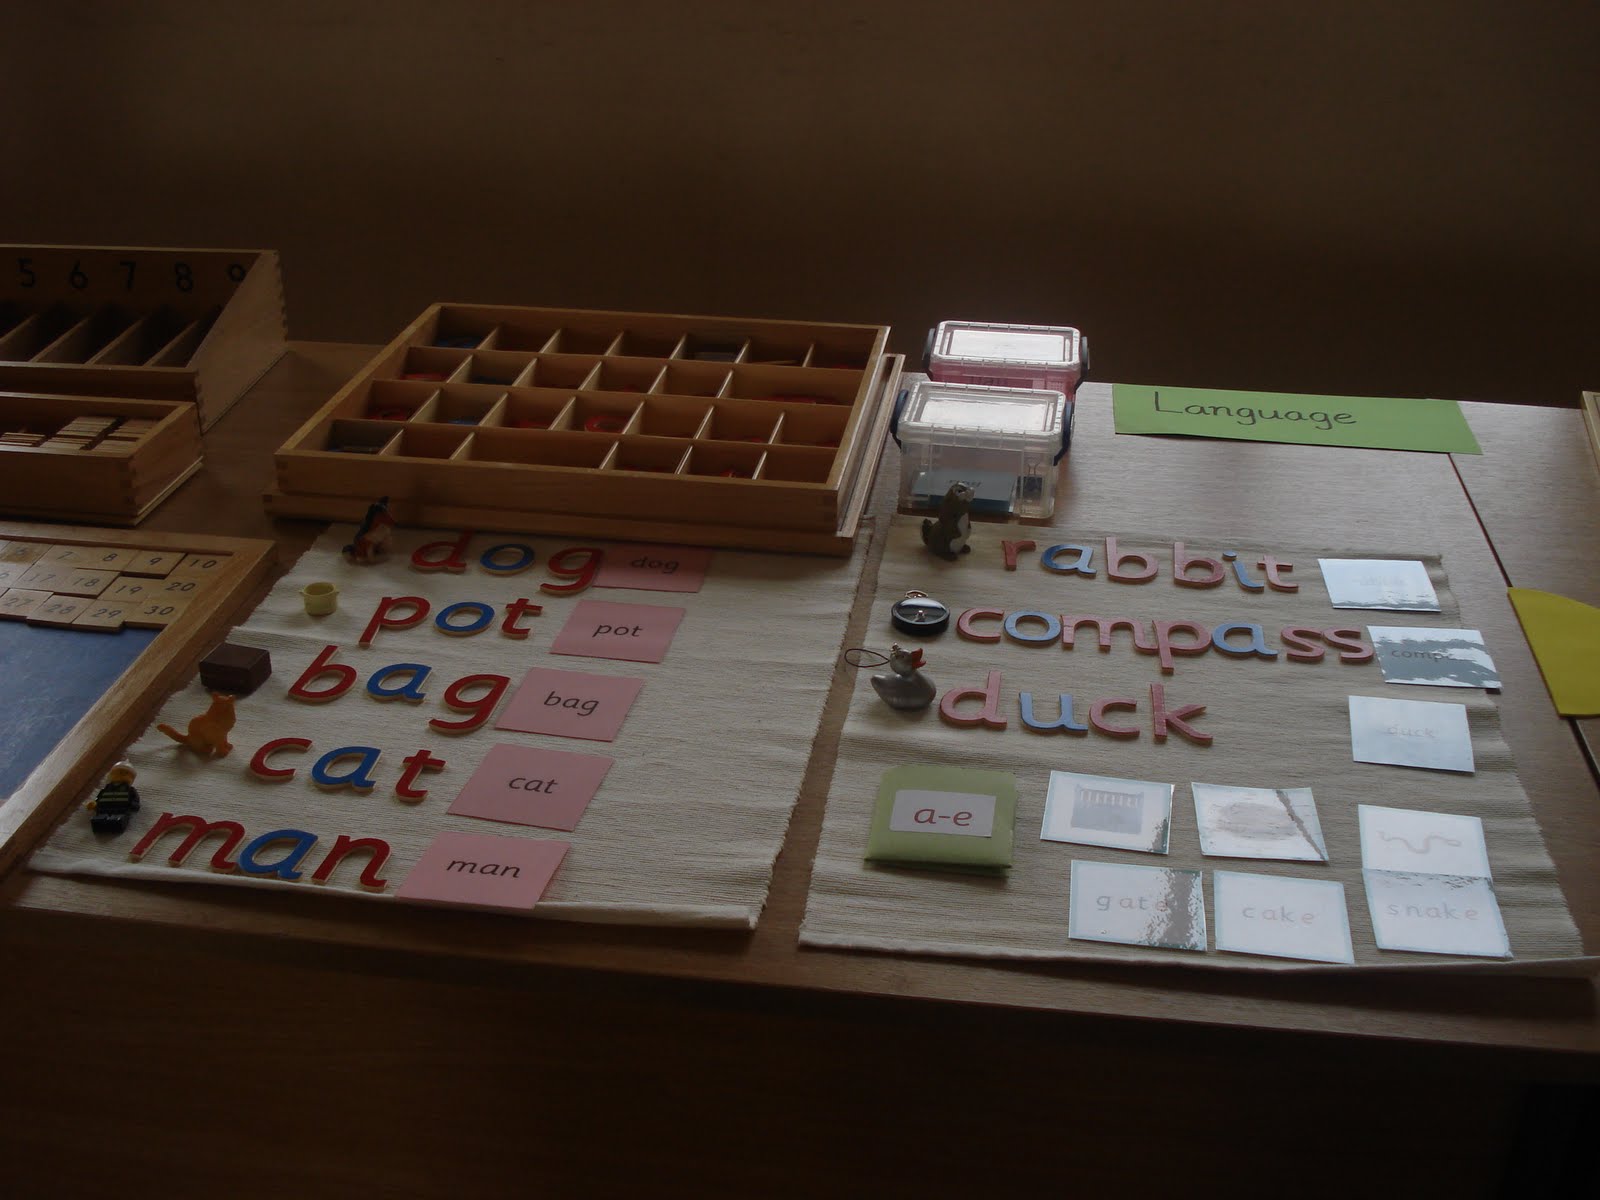
Sunday was our open day and this is the Montessori table that we had set up for the parents to get an idea of what materials we will have in the school.


Sunday, 23 January 2011

The Learning Ark Montessori Materials Shop


Finally after many years of making Montessori materials and years of waiting for my brother to make my website, I am happy to say that I now have a Montessori download material shop. The website isn't perfect yet and my brother has to finish the design and hopefully make it match my blog.

You can now buy my files from my online shop and I will be constantly adding new files. I am aiming to add at least one new file a week. You can sign up to the newsletter at the shop for updates.

I will still be making free files, but they will be moved and posted on my shop where they can be downloaded for free.

I will be preparing some discounts and giveaways for followers on this blog and those who sign up to my newsletter.

I have already added a free download to my shop, I have blogged about it here and you can download the file here.

My wish is that people who use my files will gain benefit from it and more importantly that the children/students will enjoy working with the materials. If you have any questions or problems with my shop feel free to email me thelearningark@gmail.com.

Working With The Sandpaper Letters


A while ago I posted about the sandpaper letters and explained how one should introduce them to a child. There are many activities you can do along side the sandpaper letters to provide a child with further practice, here are a few that I do with my children and a free download:


1. Matching objects by beginning letters.
This is by far the favourite activity that children enjoy. The child takes a basket of carefully prepared objects and matches them to the correct letters.
If you have a class of children you can store the objects in drawers as in the photograph below. If your homeschooling you can simple prepare a basket for your child and change the objects regularly.

2. Sand tray: I have a post about it here.

3. Matching pictures by beginning letter. These cards are used in a similar way to the objects mentioned above. I have uploaded the file for these cards to my material store and can be downloaded for free from here.
4. Fill in the letter craft activity. This isn't strictly a Montessori activity, but I did use it in my class at one stage. The child can take a letter sheet and decorate or colour the inside of the letter. I found that parents liked to see this activity and some creative children enjoyed it.
5. Make your own letter book: I don't have a picture of this, but its a lovely activity. The child will go through a selection of carefully selected catalogues and choose pictures to cut out that begin with the letter they are learning. The child will then stick these letters in a book. The end product will be a 26paged letter book that contains many pictures for each letter. Some children like this, but only a few actually complete the a book with the whole alphabet.

There are many many activities you can do, if you have a good Montessori compatible activity that can be done while the child is learning with the sandpaper letters, blog about it and link back to this post [or leave a comment]. It will be lovely to see what other people are doing.


Thursday, 20 January 2011

Bead Stair Extension Activity

I made this activity for children to work with after being presented to the bead stair. For this activity you need:
-A mat
-A bead stair
-Correct number of beads matching the bead stair
-Pipe cleaners cut to different lengths

The child counts and builds the bead stair. He can then sort the pipe cleaners in order of length. The child will start with one, find one red bead and thread it on the first pipe cleaner. Next he will find two green beads and so on.
In the end the child has constructed a bead stair. This activity will provide the child with plenty of opportunity to count 1-10 and recognise the colour coding for each number.

I didn't have bead in the correct colours, so I painted mine and the children still love them.

Thursday, 30 December 2010

Presentation of the Sandpaper Letters / Three period lesson


Some of my homeschooling friends have been asking me about the presentation of the sandpaper letters. I had a look online for videos or instructions but I am not very happy with what I found out there. I can't find an accurate presentation and it's crucial that the sandpaper letters are used correctly. I am sure that there are some good instructions out there, but I just couldn't find them.

The Sandpaper letters are taught using the three period lesson. You can find information about the three period lesson here and here. It is very important as a teacher or homeschooler to master the three period lesson as it is such an important teaching tool and is use throughout the Montessori method in all the different areas.

Before you begin:

The sandpaper letters should be presented after the child has worked with the 'I spy game' this will insure that the child already has some understanding of the relationship between sounds and a word. To begin presenting the sandpaper letters you must choose 2-3 letters that look very different and sound very different. I usually take the first letter of the child's name and another very different letter. The teacher/mum must sit on the child's right and this activity should be done at a table as we are indirectly preparing the child for writing later on.
Depending on the child you may want to begin by saying something like ''Remember we enjoyed working with the I spy game finding which objects begin with the different sounds? I would like to show you how we write these sounds.''. You do not have to say this, but I find that this helps the child to better understand what the letter symbols are. The child already knows about sounds, they can produce them, hear them and isolate the sound in a word, the only new thing with the sandpaper letters is recognising the symbols and associating them with the sounds.

The First Period

In the first period we take one letter, feel it and say the sound. Usually I feel and say the sound 3-4 times and then invite the child to feel and say the sound. Since I do it 3-4 times the child usually follows my lead and says it 3-4 times. I then put this letter out of sight or turn it over and place it on the side of the table. I take the next letter and do the same feel and say the sound 3-4 times and then invite the child to feel and say the sound. I then remove this letter and do the same for the third.

It is very important that the child only has one letter in front of them. This is why I remove the letters or place them face down. In the first period we are isolating each letter and providing the sound for it. We are also feeling the letter, make sure you know the correct directions for feeling the letter. If the child feels the letter incorrectly do not directly correct, just feel and say the letter again. It will take time before the child will know how to feel the letters correctly.

The Second Period

Usually we start the second period straight after the first, however if the child is struggling or has lost interest leave it for another day. Place the three letters in front of the child naming them as we place them. Then ask the child ''Can you feel 's'?', then ''Can you feel 'a'?' and then 'Can you feel 'm'?'. Next you should change the command, I have written a small list of different commands that can be used with the three period lesson.
-Can you feel
-Can you point to
-Can you hold
-Can you give me
-Can you put '' on the table
-Can you put '' in the basket
-Can you put '' here
-Can you point and say ''
-Can you feel and say ''
Choose one command and do it for the three letters. i.e. Can you give me 's'? can you give me 'm'? can you give me 'a'?. Then choose another command and do the same. Continue until you are sure that the child knows the letters. In this period we are providing the child with the sound of the letters and allowing the child to associate the sound to the letter. We are NOT asking the child for the sound of a letter or asking the child to name the letter, all the child has to do for now is associate the sound and letter symbol.

If the child makes a mistake in this period...
I have said 'Can you feel 's'?'' and the child felt 'm' instead. I will simple say 'This is 'm' while pointing to 'm' and then say 'can you feel 's'?. This way I am not saying no or making the child feel that they have failed. I am also giving the child the sound for the letter they picked incorrectly and asking them to find the 's'.

You should continue with the second period until you are SURE the child knows the letters. This period is long. Make sure that you give the child plenty of opportunity to feel and say the sound [repeating after you] in this period.

My own style of ending the second period is to ask the child to feel and turn over each letter. This way no letters are showing so when I come to the third period I just turn over the letters...

The Third Period

Usually I start with this period by saying 'Do you think you can tell me what these letters are?' Point to a letter [or turn over a letter if you have placed them face down] and ask the child to name and feel it. If period one and two were done correctly the child should be able to do this no problem. Do the same for the second and third letter.

After the 3-period lesson

If the child was successful with recalling the sounds for the letters then the next step is to take one letter i.e 's' and ask what begins with 's'. Help the child to name some words that begin with 's' [snake, sun, strawberries]. Do the same for the other letters. Once you have done this the activity has finished.

I hope to write a few posts about activities that can be done after the sandpaper letters.

A few tips

-Always start with the first period even if you are returning to this activity.
-Make sure the child feels and says the letter sounds at the same time.
-Make sure the child is producing the letter sounds correctly. The letters should be said as 'mm' and not 'maa'.
-Each time you present this activity start by reviewing all the letters the child has taken previously and then do the three period lesson for the new letters. If the child forgot some letters do a three period with those letters. To review the letters simple point at the letter and ask the child if they can remember the sound for the letter and feel it. If the child can't remember then ask him to feel the letter. Feeling the letter will activate the child's kinaesthetic memory and may help the child remember the sound.
-A master Montessori teacher once told me that to make sure the child does succeed always start each new period with the letter that was last used in the previous period. This way the child has that letter sound fresh in their mind and will be able to recall it with ease.

You can use this description of the three period lesson to teach new language or concepts.

If you have any questions please ask me and I will answer it as soon as possible.

Thursday, 9 December 2010

100 followers and literacy download


I just noticed that my blog has 100 followers! I feel so honoured and I am glad that people may find a benefit in what I write and post.

To say thank you to all my followers I have uploaded files for two literacy activities.

The first is Capital and lower case letter matching cards.

These cards should be used once the child has completed the sandpaper letters and worked with the pink series material, but before the child is reading pink level sentences or books.
To make the material print all the pages and join all the lower case letters into a strip [I did mine with cellotape], I joined my letters in two rows so that the activity doesn't take up too much space.
To present the activity: Tell the child that the letters they have learnt with the sandpaper letters are small letters [or lower case], explain that we also have Capital letters that we must use in certain words. Lay out the lower case letter strips, give the child the capital letter cards, ask him to match the cards. If a child can not match a card then he should put that card at the back of the pack. Usually a child will be able to match 60% of the letters without any help. Once the child has completed matching, simply show the child where the other letters go. Repeat the activity until the child can match all letters. As a variation the child can also match the sandpaper letters or moveable alphabet to the capital letters.

The second download is a writing activity that isn't strictly Montessori but I had it in my classroom years ago and the children loved it.
In this activity the child has dotted letter cards on which they can trace the capital or lower case letters. In the photo above the child is using a board pen, however I do not advise the use of these pens and instead we use Chinagraph pencils [grease pencil] which works better for the activity. The children can use these cards after tracing the sandpaper letters and working with the sand tray. To make the file, print all the pages and cut into individual cards.

Thursday, 2 December 2010

Numbers from 1-10

When one of my students first joined in October he would count up to 10 but missed a few numbers here and there. He could recognise 1,2,3 and 5 and then just guessed at the other numbers. After 5 weeks and only 10 days of actually coming to my class he is now ready to move beyond 10. Here are some of the activities he worked with not all the pictures are of him working but he did complete each activity:

Large number rods and cards. That is Little-N when he was three!!! Oh I miss how small he was!

The spindle box

Number cards and counters: All counters should have been the same colour but unfortunately I only had these.

Small number rod and cards.

Sorting the beads, counting and then finding the number card.

Short bead stair matched with the number cards.

Sand tray for writing

A younger student has been practising writing in the sand tray. Instead of sand I used salt and I think that it gives a cleaner look [perhaps because most of the furniture in my class is white]. This child does not yet like to write, colour, draw or use writing instruments. He really enjoyed writing in the salt tray and worked with this activity for a good 20mins going through every letter that he knew. It is important that the child feels the sandpaper letter correctly before tracing it in the salt/sand. When I present this activity I feel the sandpaper letter 3 times and then trace the letter in the sand/salt.

Wednesday, 24 November 2010

Montessori I SPY sound game

Before introducing your child to the sandpapers it is extremely important to work with the Montessori 'I spy game'. The 'I spy game' helps to make children aware of the different sounds in a word. The game is played at various different levels, level 1 is very concrete and the child will work through the levels until they are able to identify all the sounds in a given word. Here is a quick description of how to present this activity.

Level:1
Materials needed:
-A special box
-A few objects that start with clear sounds, make sure the child is familiar with the names of each object [for this example I have a dog]
-Mat for table
Presentation:
Take an object from the box and place it on the mat. Say 'I spy with my little eye something beginning with 'd' 'd''. Make sure that you say the sounds correctly, it should be short 'd' and not 'da'. Since there is only one object on the mat the child will be able to succeed and reply 'dog'. Reply 'I spy dog' and emphasis the 'd' in the word. Put the object back in the box and take another object, repeat the activity for the other object. You can continue this game with as many objects as the child needs. I've had children play this for 20min and more.

Do not move onto the next step until you notice that your child is becoming aware of the initial sound in each word. This may take days, weeks or months. Be patient and continue, change the objects and change the placement of the objects to keep it interesting.

Level:2

By now the child should have developed some awareness of the initial sound in a word. On the mat place two objects with contrasting initial sounds. Say to the child 'I spy with my little eye something on the mat beginning with 'mm' 'mm'. The child now has to choose between the two objects on the mat. If the child has mastered level 1 hopefully they are able to distinguish the sounds and choose the correct object. If the child chooses the wrong object, in this case the dog simply reply ''d' dog, I spy something beginning with 'mm''.
Continue working with two objects at a time. As the child succeeds at the activity gradually increase the number of objects.

Level 3: In this activity you use the environment [room, car, garden]. Choose a sound that represents more than one item in the environment, for example book, basket, ball. Say 'I spy with my little eye many things that begin with 'b'. Encourage the child to find as many objects as possible.

Once the child has mastered this step then they are ready to start the sandpaper letters. The I spy game doesn't end here, continue to work through the different levels, it is still very important that you do this as this will help your child to isolate each sound in a word and ensure that they will be able to successfully work with the pink series and moveable alphabet later on.

Level 4: Now we are focusing on the ending sound of a word. It is easier to limit you objects to three letter phonetic words like dog, cat, pot.
Place two objects on a mat that begin with the same letter but end in different letters for example peg and pin. Say, 'I spy with my little eye something on the mat that begins with 'p' and ends with 'g''. Usually the child will not get this first time, if the child chooses the pin say 'Yes pin begins with 'p' but I spy something the begins with 'p' and ends with 'g'. Lets listen the the ending sounds, p i n, p e g. Then repeat I spy....'g'.
Once the child has mastered this level they will be able to identify the beginning and ending sound of a word.

Level 5: Once level 4 is mastered play the 'I spy game' with the middle sound. This can be very difficult, make sure you have three letter phonetic objects and help the child to sound out the word.

Please note that during these activities you do not show or teach the letter symbols, this activity is an auditory activity and the child should focus on hearing the sounds in a word. If you do the letters at the same time then they child is likely to get confused.

Begin presenting the sandpaper letters after the child has mastered level 3, but do this as a separate presentation/activity.

Do not get frustrated and stressed if the child is not mastering any of the levels, you can continue with each level as long as the child is happy and interested. If the child is unhappy or uninterested it may be because the child is simply not ready. In that case the best thing you can do is put the activity away and try again in a few weeks. But do try it again as this activity is extremely important for many of the later activities in the language area.

If you have an older child who is having difficulty spelling phonetic words, work through this activity and increase the difficulty by having objects with similar sounds like 'b' 'p'.

Those of you who I am helping through your home-schooling journey, try level 1 and 2 and then report back to me on how the activities went!!